Wednesday, December 16, 2020

Surnoli

Surnoli is a delicious Konkani dish from Goa eaten for breakfast, as a snack, or even for dinner. It can be made in sweet and savory versions.

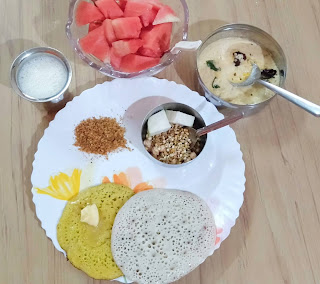
Sweet (yellow) surnoli with butter an savory surnoli with fresh coconut chutney and dry coconut chutney

Ingredients

2 cups raw rice ( for 10 surnolis)

1 cup beaten rice (poha)

1 tsp fenugreek seeds

1 cup beaten yoghurt mixed with 1 cup water

1 cup grated coconut

Salt to taste for savory portion

Jaggery to taste and ½ tsp turmeric powder for sweet portion

Instruction

-          Wash the rice, beaten rice and fenugreek seeds, mix with the beaten yoghurt and water and let it soak for 3 to 4 hours.

-          Grind the soaked rice with grated coconut.


-          Divide the batter into two parts. Grind one part with jaggery and turmeric powder.

-          Allow the batter to ferment for 12 hours. It should rise well. If that has not happened, add a pinch of baking soda just before making surnolis.

-          To the savory portion, add salt and mix well.

-          Heat an oiled thava and pour the batter, don’t spread it.

-          Let it cook on medium flame and remove when cooked. No need to turn upside down.

Sweet Surnolis are served with butter while savory ones are eaten with coconut chutney and/or sambar. 

Sunday, December 13, 2020

Cabbage Kofta

Kofta is a preparation that has onion tomato gravy in which different vegetables mixed with gram flour and other ingredients are deep fried are added.

Ingredients

For koftas

2  cups finely cut cabbage

2 tbsps gram flour ( besan)

1 tbsp cut coriander leaves

Salt to taste

A pinch of baking soda

¼  tsp red chilli powder

A pinch of asafoetida

Oil for frying

For gravy

1 big onion sliced

3 tomatoes cut

2 tbsps oil

½  cup beaten yoghurt

1/3 tsp turmeric powder

¼  tsp red chilli powder

1 tsp coriander powder

1/3  tsp garam masala powder

3 cups water

Instruction

·         Grind the sliced onion and cut tomatoes. 


Heat oil in a kadai and add this. Reduce the flame and let it cook, keep stirring in between. When it starts separating from the sides, add the beaten yoghurt and masala powders. Mix well and add the water and salt.  Let it come to a boil.


·         Steam the cut cabbage in a colander for about 8 minutes. Squeeze the cabbage lightly (keep aside the juice).

·         Add all other ingredients, adding the cabbage juice if needed (otherwise add it to the gravy), to make into a smooth dough. Make small balls from this and deep dry till golden brown.

·         Add the fried koftas into the boiling gravy. Reduce the flame and simmer for ten minutes.


·         Garnish with cut coriander leaves before serving with chapatis.

·         You can make koftas with grated carrots, grated bottle gourd ( my favorite), or mixed vegetables.  There is no need to steam grated carrots or bottle gourd. Grated bottle gourd need to be squeezed before mixing with besan, and the juice added if needed for the correct consistency.  

                           Bottle gourd kofta with paratha, string beans potato sabzi, and aamras

Thursday, December 10, 2020

Easy Semolina Handvo

Handvo, the savory lentil cake, is a traditional Gujarati dish. I loved it the moment I had in Gujarat and took its recipe. Later I got another recipe which is easier to make, with semolina and bottle gourd. Now it is a regular breakfast item in our home. It is so yummy, with the crispy crust and soft inner portion. We have it with green coriander chutney, tomato ketchup or a mix of tomato ketchup and mustard sauce.

Ingredients

1 cup sooji (semolina)

1 cup grated bottle gourd

½ cup yoghurt

1 tsp Eno fruit salt- You get small sachets of Eno salt, one sachet is enough here.

Salt to taste

To season:

1 tbsp sesame oil (or any other oil)

¼ tsp mustard seeds

1 ½ tsp white sesame seeds

1 green chilli cut fine

1 tbsp cut coriander leaves

Instruction

-          Squeeze the grated bottle gourd (keep the squeezed out liquid, we will be using it later)

-          Mix the semolina with grated, squeezed out bottle gourd and beaten yoghurt, keep aside for about 20 minutes.

-          Now heat the sesame oil, add mustard seeds, when they splutter, add the sesame seeds, cut green chilli and coriander leaves. Cover and switch off the flame. Heat a thick bottomed thava, pour some sesame oil on the surface and reduce the flame.

-          Add 1 tsp Eno salt to the bottle gourd juice and mix. Add this, salt, and the seasoning to the semolina mix.

-          Lightly knead and spread it on the oiled thava. Cover it and let it cook for 8 minutes.  

-          Now turn it over, cook for 6 minutes and it is ready to be served. 

-      It is good for breakfast and also as a snack. 

Tuesday, December 1, 2020

What is your bitter today?

The Ayurvedic diet is based on the principles of Ayurvedic medicine and focuses on balancing different types of energy within your body, which is said to improve health. It is an eating pattern that's been around for thousands of years. In Ayurveda, there are six tastes that can be found in our diet: Sweet, Sour, Salty, Pungent (spicy), Bitter, Astringent. To maintain proper health it is necessary to consume food with all these tastes. I have found that bitter is one taste that is commonly missing from daily diet.

Bitter taste?

To encourage my kids to eat bitter foods like bitter gourd, I would ask them, “What do you feel like on putting a bitter item into your mouth?”

“Feel like spitting it out.”

“Right, so when this reaches the cells of your body, that is what they would do. They spit out all the toxins inside and your body remains healthy.”

This approach, along with giving Reiki to the food made sure they developed healthy eating habit.

A leaf a day


When I had sciatica type pain years back, I started eating parijat leaves, which gives relief. Later I made it a habit to eat one parijat leaf every day in the morning. It makes sure I have my bitter taste for the day. The leaves juice is bitter and works as a tonic. Its decoction is excellent for arthritis, constipation, and worm infestation. The beautiful parijat flowers are steeped in boiled water to make tea for drinking.


Monday, November 30, 2020

Turkish bread


We had a great time in Antalaya enjoying the amazing Turkish cuisine. It was such a joy to be able to prepare Turkish bread at home.

Ingredients

250 gms All purpose flour OR wheat flour – for 4 breads

1 tsp dried yeast

½ cup yoghurt

Salt to taste

¼ cup sesame oil OR olive oil

¾ to 1 cup Water

To garnish:

1 tbsp ghee Ghee

1 tbsp kasuri methi

Instruction

-          Mix yeast and a few grains of sugar in 2 tablespoons of lukewarm water and keep covered for ten minutes.

-          Take the flour in a big bowl, add salt, the dissolved yeast, yoghurt, oil, and knead.

-          Keep adding water slowly and knead into soft dough.

-          Cover the dough with cling film or wet cloth and keep for an hour for it to double in size.

-          Divide the dough into four, spread each one into round, dusting some dry flour, and keep covered for ten minutes.

-          Heat skillet on medium heat, smear oil. Cook each bread on both sides till done.

-          Apply ghee on the surface and sprinkle kasuri methi.

-          Serve with spinach sabzi or any sabzi of your choice.

Sunday, November 29, 2020

Lebanese Falafel Pita Pocket Sandwich

I had made this dish in 2014, but this is an easier version.

Pita bread

Ingredients

2 cups Wheat flour     

1 tsp Salt     

1 tbsp Sugar 

1 tsp Yeast   -

1 tbsp Olive Oil or any other oil          

1 ¼  to 1 ½ cups Warm water    

Instruction

-          Mix the yeast with a little sugar and ½  cup lukewarm water and keep it covered for about 10 minutes till it turns frothy.

-          Take the flour, salt and the remaining sugar in a large bowl. Make a small depression in the middle and pour yeast water in the depression.

-          Slowly add 1 cup of warm water, and stir with wooden spoon or rubber spatula until elastic.

-          Place the dough on a floured surface and knead for about 10 minutes till the dough is no longer sticky and is smooth and elastic.

-          Smear a large bowl with oil and place the dough in the bowl. Roll the ball of dough around in the bowl so that it has a light coat of oil on all sides. 

-          Cover the bowl with plastic wrap or a damp cloth or cling film and set aside to rise for about 2 hours.

-          Once doubled, roll out in a rope, and pinch off 5 pieces.

-          Roll out each ball of dough with a rolling pin into circles. Each should be about 6 inches across and evenly thick. Cover with a cloth and leave for 30 minutes.

-          Heat the skillet (medium to high heat), roast each one on both sides and keep aside.

Falafel

Ingredients

1 cup dried chickpeas (Bengal gram) soaked overnight

1 large onion, chopped

1 inch piece of ginger finely cut

Some fresh coriander leaves finely cut

1 Green chilli cut fine

1 teaspoon coriander powder

1 teaspoon cumin

1 tablespoon refined flour

A pinch of baking soda

Salt

Pepper

Oil for frying


Instruction

-          Coarsely grind the soaked chickpeas after draining the water. Add all the above ingredients and mix well.

-          Form the mixture into small balls, deep fry, and drain.


Salad for filling:

-          Cut 2 cucumbers and 2 tomateso into small pieces. Make a salad dressing with lime juice, olive oil, honey, salt and ground black pepper.

-          Mix the salad dressing with the cut cucumber and tomatoes

Making the sandwich

-          Cut the pita bread into half, split open to accommodate the filling.  Apply Thousand island dressing and coriander leaves chutney on the inner side, slide in the falafel, the salad and cut olives.

-          Enjoy it for lunch, dinner, or as a snack.
Thursday, November 26, 2020

Iron For Your Body and cast iron utensils

Hemoglobin in the red blood cells carries oxygen from your lungs to transport it throughout your body and iron is an important component of haemoglobin. So the major reason why our body needs iron is because it helps to transport oxygen in the body. It has other functions like maintaining healthy cells, skin, hair, and nails.

Foods containing iron and its deficiency

Foods that contain iron are spinach, legumes, pumpkin seeds, quinova, red meat, poultry, liver and organ meats. Low iron levels are common and can, if left untreated, progress into iron deficiency anemia (IDA). This can cause tiredness, shortness of breath, difficulty in concentrating, frequent bouts of illness, difficulty in regulating body temperature or often feeling cold, pale skin, heart palpitations, and headaches.

Iron supplements

Taking iron supplements in the absence of iron depletion is dangerous. Unlike other supplements or vitamins, the body does not regulate iron homeostasis well and the excess iron cannot be excreted from the body. Excess iron can lead to damage to a range of organs including the liver, skin and pancreas, and it may also be related to cancer, heart disease and Alzheimer’s disease.

Side effects of iron supplements are constipation, dark stools, stomach pain, nausea, and, vomiting. It seems confusing that absorbing more iron could lead to fatigue. For children, iron overdose can be toxic. Symptoms of iron poisoning include severe vomiting, diarrhea, abdominal pain, dehydration, and bloody stool. Simply put, Iron supplements should only be taken under medical supervision and when a diagnosis of iron deficiency has been made.

A simple way to maintain iron levels

Cooking in a cast iron vessel once a week and consuming that food will maintain the body’s iron requirement. There are two things to be taken care of. One is, make sure there is no rust in the vessel. If you see rust, scrub and wash thoroughly before cooking. Secondly, after you cook (especially if the dish contains acidic components like tomatoes), transfer it to another vessel immediately. 

These are the beauties in my kitchen, which I use routinely. 


References:

https://www.webmd.com/vitamins-and-supplements/features/iron-supplements#1

https://healthybutsmart.com/iron-supplements/ 

Wednesday, November 25, 2020

Lady's finger (Okra) sabzi

Lady's finger or okra is grown in many parts of the world, especially with temperate or tropical climate. 

It is widely consumed in the Indian household. It contains pectin which helps in lowering bad cholesterol. It is a great option for diabetics since the high fiber content is of a type which releases sugars slowly into the blood due to slow rate of digestion. Research has shown that okra contains higher amounts of antioxidants compared to other vegetables. Antioxidants prevent oxidative damage to cells and hence lower the risk of cancer. The high fiber content maintains a healthy digestive system and prevents colon cancer. Its high vitamin C content boosts immunity and prevents common infections. 100 grams of okra can give you around 40% of the daily recommended intake of vitamin C.

Ingredients:

250 gms lady’s fingers

1 onion cut fine

6 flakes of garlic

2 small tomatoes cut fine

Salt to taste

2 tbsps oil

¼ tsp mustard seeds

1/3 tsp turmeric powder

¼ tsp red chilli powder

1 tsp coriander powder

1/3 tsp dried mango powder

¼ tsp garam masala powder

Instruction:

- Heat the oil in a thick bottomed pan, add mustard seeds. When they splutter, add cut onion, garlic and tomato.

- When they become pliable, add cut okras and salt. The secret of getting crispy okra dish is to cook on medium flame and not covering it completely with a lid while cooking. Cover with a lid, but leave some space for steam to escape, otherwise it will give a soggy dish.

- Keep stirring in between and when it is cooked (takes within ten minutes), add all the masala powders (sometimes I don’t add any of the masala powders), mix well and remove from the fire.

- Serve with steamed rice or chapatis


References:

https://www.1mg.com/articles/8-surprising-health-benefits-of-bhindi-ladys-finger/

Wednesday, November 11, 2020

Making Raw Cashews Edible


Truly raw cashews contain a substance known as urushiol, found in poison ivy. So they are not safe to eat. Cashew kernels sold as “raw’ in stores have been steamed, which removed the toxins.  

Cashew nuts have several health benefits. They contain antioxidants, which combat free radicals that build up in our bodies and cause cellular damage, which are partly responsible for the visible signs of aging. Evidence shows that eating nuts regularly can help prevent painful gallstones from forming because they work to lower bad cholesterol and they lower triglycerides, both factors in gallstone formation.

The brain needs a steady supply of healthy fatty acids in order to function. The good fat that we get from cashews, along with zinc, iron, copper and manganese, help support cognitive function and mood regulation, and can alleviate mental disorders such as ADHD, depression and anxiety. Copper deficiency can lead to anemia, a condition where a person’s red blood cell count is too low. One serving of cashews contains a lot of copper and some iron, which together help in the formation and utilization of red blood cells.

Cashews are full of monounsaturated fats, which are needed to lower LDL cholesterol (AKA the bad kind) and raise HDL cholesterol (AKA the good kind). They also help lower blood pressure, combat against the formation of plaque buildup in artery walls, and help to lower triglyceride levels, which all works together to fight against heart disease, heart attack and stroke.

Raw cashews, a delicacy

During the season when the trees used to be laden with cashew fruits, as kids we used to pick them up and the ladies of the house used to make the Kerala preparation ‘Theeyal”, which all used to relish. In Karnataka, I found that raw cashews are available in the market during season and the price is to be paid per piece, because it is a skilled job to take out the kernels without breaking.

Cashew nuts from the tree

When the cashew tree that we had planted years ago started giving yield and it became a frustrating trial and error methods for years to take out the cashew nut. But finally, my husband arrived at a workable solution and I thought of sharing it here.

The steps

1.       The first step is to pressure cook the cashew nuts in water with 1 teaspoon of oil for 7 minutes. Allow it to cool and open. Drain and keep aside, do the next step after at least four hours.


2.       Cut them open and gently pry out the nuts from inside the two halves.


3.       Boil them in salted water with one teaspoon oil for ten to fifteen minutes depending on the variety. Pour off the water, wash once in cold water, and drain.

4.       Take off the thin skin from each and now they are ready to be consumed as they are, or to make any preparation you like.


References:

https://spreademkitchen.com/blog/the-health-benefits-of-cashews-11-reasons-to-eat-these-delicious-tree-nuts

Friday, October 2, 2020

Making butter and ghee at home

 It is believed that ancient nomadic people first discovered the miracle of butter. While travelling long distances, nomads would attach sacks containing milk to their pack animals and the cream was eventually churned into butter.

 Letting the cream ferment with live bacteria before churning creates a tangy version called cultured butter. Cultured butter is creamy, more buttery in flavour. Cultured or fermented dairy products contain lactic acid-producing bacteria that begin to break down both lactose (milk sugars) and casein (milk proteins), which aids in digestion. These helpful bacteria strengthen our immune system, checks pathogenic bacteria from multiplying and helps digest our food. 

In Indian culture, the cow is considered sacred; cow represents the soul, and it is gentle and generous. The butter it gives is a sacred offering, fuel for lamps, and treasured food. Krishna worshippers have special love for cows. The Hindu god's role as a cowherd, and stories about his love of butter are legendary. He is lovingly called "Makhan chor." This means, "butter thief."

Ingredients

4 cups Milk cream

1 tbsp yoghurt

Method of preparation

-         To get good amount of thick cream and later butter, full fat, unhomogenized (pasteurized is ok), non UHT milk should be used.   I boil full cream milk in the morning, cool and keep in the refrigerator uncovered till evening. Then a thick layer of milk cream will be formed on the surface. This I carefully remove and keep in the freezer.

-          In 15 days I get about 4 cups of cream. Then I take it out of the freezer in the morning and leave outside to bring it to room temperature.

-          In the evening I add 1 tablespoon of yoghurt and mix well, close and leave till next day morning.

-          In the morning I use the churner or wooden hand blender and move it clockwise in the vessel containing the milk cream. In just about 8 to 10 rotations, the butter will form in lumps. You can do this in a blender also. I find using blender  and cleaning it later cumbersome.

                                                                 Wooden hand blender

-         Now I add cold water from the refrigerator and use the churner for just about 5 seconds. The butter forms huge lumps, which is taken out and is ready for use.

-          For making ghee, the butter is kept in a thick bottomed pan on low fire. 


It should be stirred in between and when the light brown colored milk solids settle down, and the surface is filled with bubbles, remove from fire.

-          The ghee is strained, cooled and stored in an airtight container at room temperature. It should not be refrigerated. The separated solid can be eaten as such (I love it), or after adding sugar, or used to make sweets.


Tuesday, September 29, 2020

Paneer (Cottage Cheese) Paratha

Crispy parathas stuffed with spicy soft cottage cheese served with green chutney and butter is one of my favourite breakfast items.


Ingredients

1 ½ cups wheat flower (for 2 parathas)

Salt to taste

½ tsp ajwain seeds

4/4 cup warm water

For filling:

5 tbsps grated paneer

½ tsp ginger cut fine

1/3 tsp finely cut green chilli OR ¼ tsp red chilli powder

1 tbsp cut coriander leaves

Instruction

-          Knead the wheat flour with salt, ajwain and water into somewhat stiff dough.

-          Mix all the ingredients for the filling. I don’t add salt to this as it makes it soggy while filling.


-         Divide the dough into two, spread each one into a round, put the filling inside, bring the periphery together, flatten and gently spread into a larger round.


-          Heat thava on medium heat and cook the paratha from both sides, applying ghee.

-          Serve with coriander mint chutney and butter, or tomato ketchup.


Raw Papaya Chutney (Kacha Papaya Sambharo)

Raw papaya chutney is a tongue tickling Gujarati dish that is served with fafda. I loved it with jowar roti and dal.

Ingredients

2 cups of peeled, grated raw papaya

1 tbsp oil

A pinch of asafoetida

1/3  tsp mustard seeds

Salt to taste

½ tbsp sugar

½ tsp turmeric powder

¼ tsp red chilli powder

½ tsp coriander powder

1 tsp lemon juice

Instruction

-          Heat oil in a pan, add mustard seeds. When they splutter, add asafoetida.

-          Toss in the grated papaya, sauté for about 4 minutes on medium to high flame.

-          Add all other ingredients except lemon juice. Sauté again for 4 minutes and remove from fire.

-          Pour the lemon juice and mix well. It is ready to be served.

Mishti Doi (Bengali Sweet Yoghurt)


Ingredients

3 cups of milk (for 2 cups of mishti doi)

2 ½ tbsps sugar (Traditionally palm jaggery is used)

2 tsps of yoghurt culture

A few strands of saffron

6 almonds slivered

Instruction

-          Keep three cups of milk to boil, reduce the flame once it starts boiling. When it boils for about 5 minutes, add the sugar and stir well.

-          Stir in between and let it simmer till it reduces in volume to two cups.

-          Let it cool to lukewarm temperature, pour into two bowls. Add 1 tsp of yoghurt culture into each bowl and stir well.

-          Keep in a warm place for about 12 hours for it to set, put some saffron strands on the top and refrigerate.

-          While serving, add the slivered almonds.